Update 04/08/2014: It seems like this post has been helpful for a lot of people, which really makes me happy! I just wanted to let new readers coming by know that the configuration I present in this post is out-of-date. However, I have my Emacs configuration on GitHub, and do try to keep it up-to-date. If you have any difficulties getting the configuration in the GitHub to work, please do submit a bug request and I will try to help you fix the problem.
As I mentioned in last week’s post, I am a heavy Emacs user and find it invaluable as an environment for my research. In particular, I use Emacs most for data analysis and modeling in Python, including an interface to IPython, which allows me to quickly switch between writing and running snippets of code. This proves to be a great replacement MATLAB, at least in my opinion.
I frequently get requests for my .emacs configuration file or questions about how I have such an environment set up. As such, in this post I’m going to document how to set up your Emacs configuration to support rapid Python development, including the plugins I have installed and the keyboard shortcuts I use most often.
Note that I am running GNU Emacs 23.3.1 (x86_64-pc-linux-gnu, GTK Version 2.24.5). I have never tried running it under OSX or Windows, so I can’t guarantee that these instructions will transfer, but you are welcome to try. If you run into any inconsistencies, feel free to send them to me and I will update this post accordingly!
Also, if you are new to Emacs, please read my beginner’s guide first, as I will be assuming familiarity with basic Emacs functionality and terminology. I will also assume you can at least read and understand LISP to some extent (but you don’t necessarily have to be able to write it).
Overall Goal
In this tutorial, we’re going to be installing several Emacs plugins
and modifying the Emacs initialization file, which is typically found
at ~/.emacs. Here are my .emacs and configuration files that it
includes (note these are NOT the same as the actual plugins: I just
like to divide my configuration so into bite-sized chunks so it’s
easier to manage):
- .emacs
- ido-settings.el
- auto-complete-settings.el
- fill-column-indicator-settings.el
- python-settings.el
- ui-settings.el
- window-settings.el
- cursor-settings.el
- text-settings.el
- color-theme-settings.el
You can find a zip of all these .el files (excluding the .emacs)
here. EDIT: The most recent version of my emacs configuration
(which might not necessarily be consistent with this post) can be
found here.
If you choose to install these configuration files, place the .emacs
in the root of your home directory (~/.emacs) and put the other
files in ~/.emacs.d/settings.
A note about installing plugins: I’ve found that installing plugins
from the Ubuntu repositories to be a bad idea because different
versions don’t always play nicely with one another. It’s better to
install the most recent version from source, and that’s what I’ve done
for this tutorial. If you download and install the plugin versions (as
I’ve indicated via the directories that I install them into), this
should all work. Note that you may have to actually compile some of
the plugins as well (if there’s a Makefile, run make; sudo make
install and if there’s a setup.py file, run sudo python setup.py
install. If there’s both, run the Makefile first and then run the
Python setup).
Here is the list of plugins we’ll be going through/installing:
- Interactively Do Things (included by default)
- Auto-complete (version 1.3.1)
- Fill column indicator (version 1.83)
- IPython (version 0.14)
- Python mode (version 6.0.11)
- Pymacs (version 0.25)
- Ropemacs (version 0.7)
- Highlight current line (version 0.57)
- Color theme (version 6.6.0)
Non-Python Environment
There are several plugins that I use which aren’t related to Python
coding, but are nonetheless very valuable: ido-mode (i.e.,
“Interactively Do Things”), general auto-completion, and the fill
column indicator.
Interactively Do Things
“Interactively Do Things” (a.k.a. ido) is a plugin that should
be included in Emacs by default; however, it is not typically enabled
by default. You can enable it by running M-x ido-mode in Emacs, or
by adding the following lines to your .emacs customization file:
```scheme Interactively Do Things (require ‘ido) (ido-mode t)
Ido is handy because it makes switching between buffers,
opening/closing files, etc., extremely easy to do. Here's a few
screenshots of what it looks like to switch buffers; notice that it
lists in the minibuffer all the different buffers you could switch to:
[![][24]][24]
[24]: /assets/img/emacs-python/ido-switch-buffers.png
The \*scratch\* buffer is bolded, which means it's the default. Let's
say I want to switch to \*Messages\*, though. As I start typing the
name, the list of buffers in the minibuffer is updated to show only
those that match what you're typing (filtering) by:
[![][25]][25]
[25]: /assets/img/emacs-python/ido-switch-buffers-messages.png
I could, at this point, simply press enter and it would switch to the
\*Messages\* buffer. You get similar functionality when searching for
files, killing buffers, etc. Saves a lot of time, not having to
remember buffer names exactly and not having to fully type them out!
There's a lot more to ido that I'm not going to go into; I encourage
you to read through the documentation and find out more about it.
### Auto Complete
[Auto complete][15] is another handy plugin which keeps track of
recent things you've typed and will offer to auto complete them for
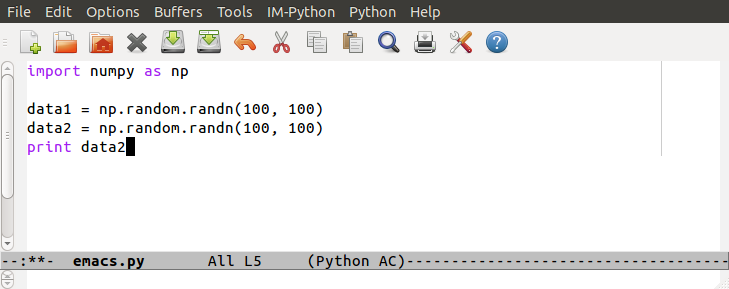
you. Let's say I'm editing a python file:
[![][26]][26]
[26]: /assets/img/emacs-python/auto-complete-1.png
And now I want to print out one of the arrays I just created. As I
start to type, a list pops up with suggestions:
[![][27]][27]
[27]: /assets/img/emacs-python/auto-complete-2.png
I can use the arrow keys to highlight the selection I want and press
enter to choose it.
[![][28]][28]
[28]: /assets/img/emacs-python/auto-complete-3.png
The variable name is completed and I don't have to type the rest,
similar to the auto-completion behavior you'd see in Eclipse or
another popular IDE. This is useful even if you don't have competing
variable names -- if you have particularly long names, auto-complete
will remember them, too, and you will only need to type the first few
characters.
To enable auto complete, [download it][29], install the files into
`~/.emacs.d/auto-complete-1.3.1/`, and add the following lines to your
.emacs:
[29]: http://cx4a.org/software/auto-complete/#Latest_Stable
```scheme Auto Complete
(add-to-list 'load-path "~/.emacs.d/auto-complete-1.3.1")
(require 'auto-complete)
(add-to-list 'ac-dictionary-directories "~/.emacs.d/ac-dict")
(require 'auto-complete-config)
(ac-config-default)
(global-auto-complete-mode t)
Fill-Column Indicator
It is good coding etiquette to keep lines short (e.g., no longer than 72 characters – this is because some people use 80 character terminals, and constantly scrolling to the left/right is very annoying!). It’s furthermore just nice coding style to have lines a consistent length.
To let myself know when I’m running over line length, I have the
fill column indicator plugin installed. This draws a line on the
right side of the screen, indicating the “fill column” (which is just
another way of saying “the ideal maximum line length”). If my text
runs past this line, I know I need to do some formatting to make it
span multiple lines (if I’m just writing text, I will use M-q to
wrap it).
To enable this plugin, download it and install the file in the
~/.emacs.d/fill-column-indicator-1.83/ directory, then add the
following to your .emacs:
```scheme Fill Column Indicator (add-to-list ‘load-path “~/.emacs.d/fill-column-indicator-1.83”) (require ‘fill-column-indicator) (define-globalized-minor-mode global-fci-mode fci-mode (lambda () (fci-mode 1))) (global-fci-mode t)
## Python Environment

Ok, moving on to the actual Python configuration now! First off,
you'll (of course) need to have Python installed. I'm currently
running 2.7. You'll also want to install [IPython][17] and I recommend
you avoid the version in the Ubuntu repositories because it's out of
date. You can download a newer version [here][32]; I am currently
running a development version of 0.14.

 [32]: http://ipython.org/download.html

Second, you'll need to actually [download][18] the `python-mode`
plugin and install the files into
`~/.emacs.d/python-mode-6.0.11/`. Add the following to your .emacs:

```scheme Python
; python-mode
(setq py-install-directory "~/.emacs.d/python-mode-6.0.11")
(add-to-list 'load-path py-install-directory)
(require 'python-mode)

; use IPython
(setq-default py-shell-name "ipython")
(setq-default py-which-bufname "IPython")
; use the wx backend, for both mayavi and matplotlib
(setq py-python-command-args
  '("--gui=wx" "--pylab=wx" "-colors" "Linux"))
(setq py-force-py-shell-name-p t)

; switch to the interpreter after executing code
(setq py-shell-switch-buffers-on-execute-p t)
(setq py-switch-buffers-on-execute-p t)
; don't split windows
(setq py-split-windows-on-execute-p nil)
; try to automagically figure out indentation
(setq py-smart-indentation t)
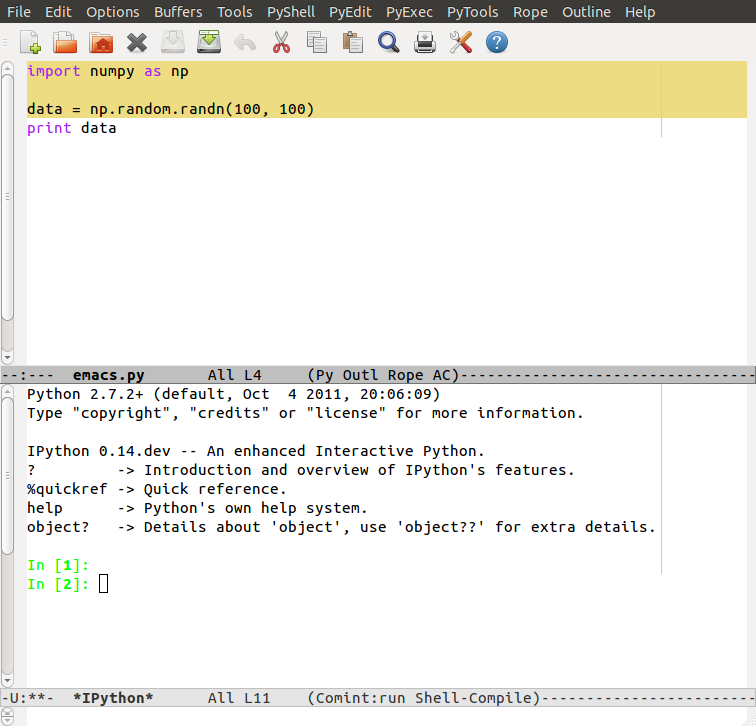
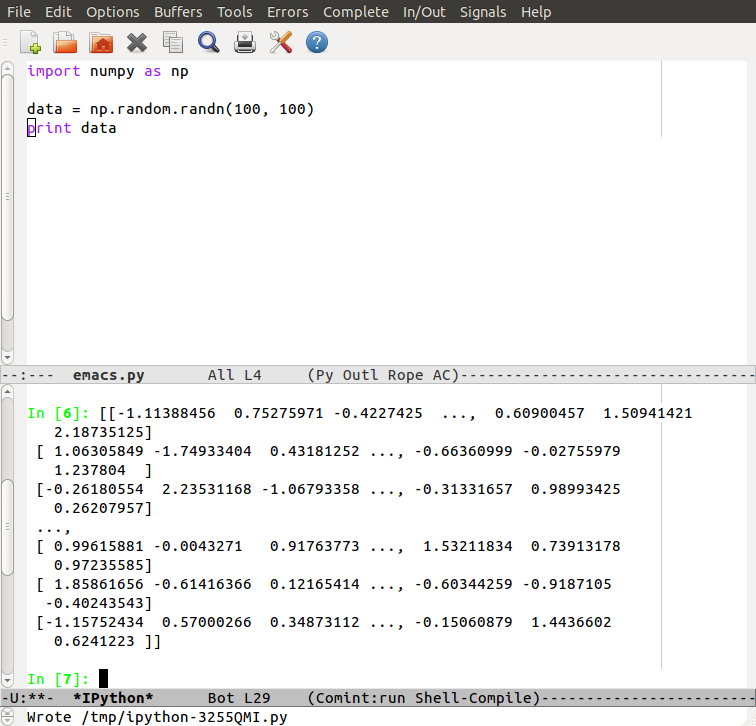
Now open up a Python file and hit C-c !. Another window will be
created, and in it should be an IPython interpreter:

(I’m not entirely sure what’s up with the multiple In prompts at the
beginning, but it doesn’t seem to matter so I haven’t bothered to
investigate it as of yet.)
Not only can you run IPython inside of Emacs, but you can actually send code from the file you’re editing to the interpreter. To evaluate a snippet of code, first select a region:
Then hit C-c | to send it to IPython:
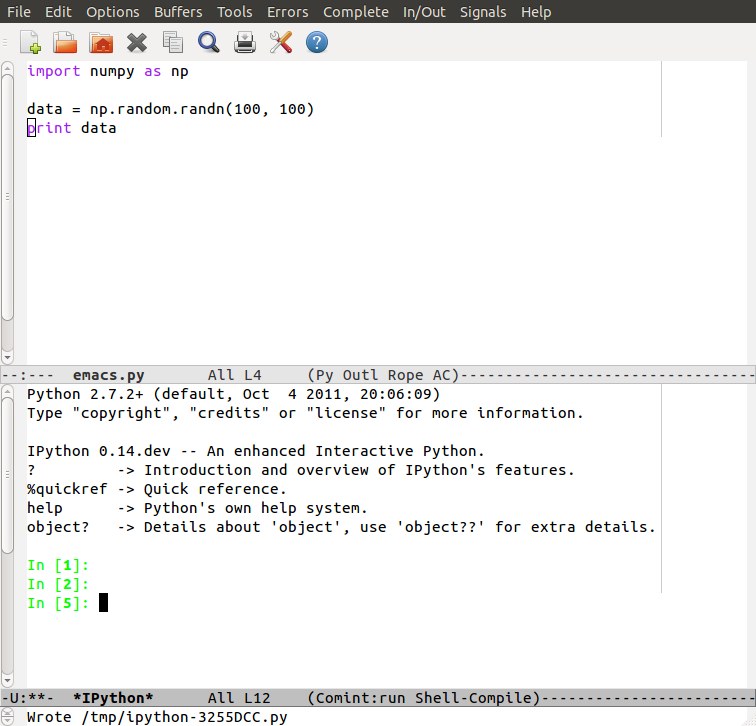
Now that the code’s been executed, you can refer to it in the IPython environment:
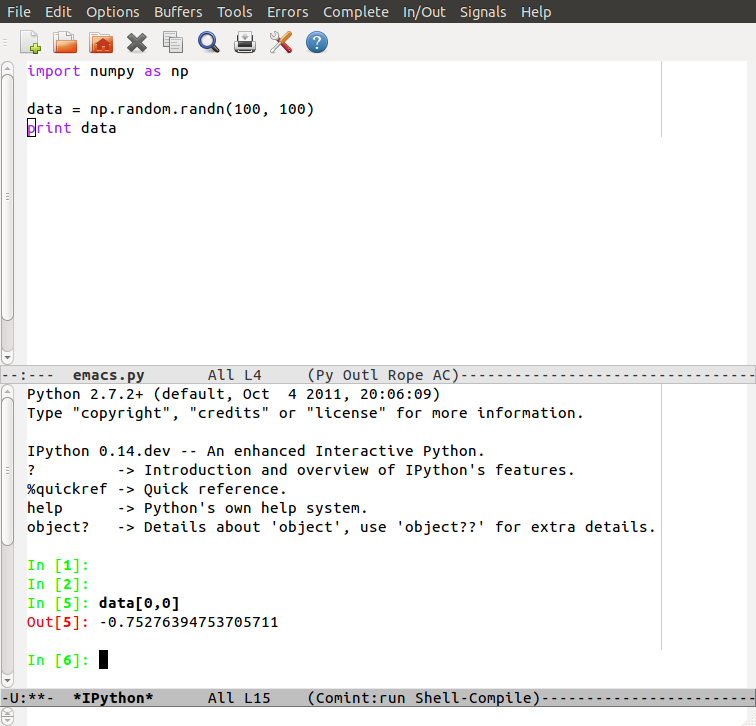
You can also send an entire buffer at once with C-c C-c:
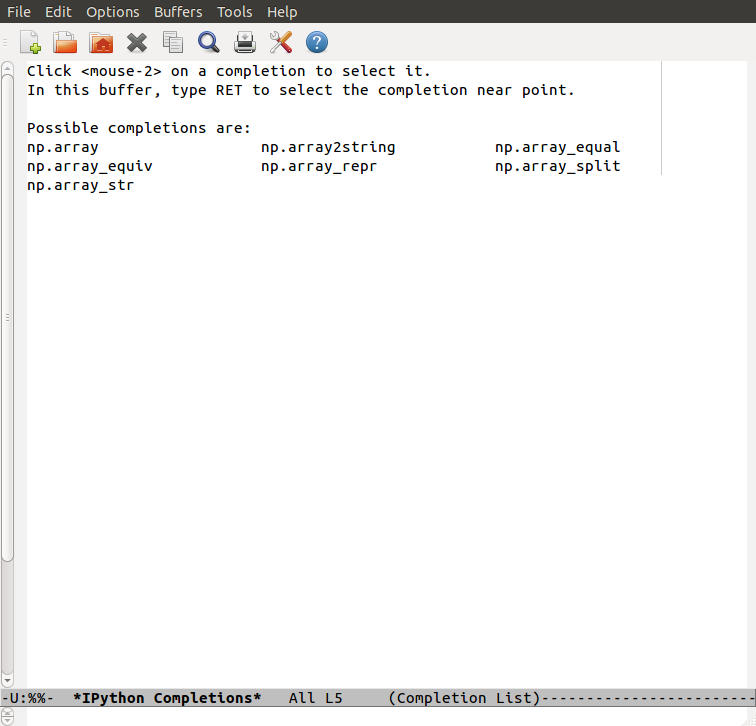
python-mode also offers integration with IPython for tab
completion. So, if you can’t quite remember the name of a function,
just type what you can think of into the interpreter and press
TAB. For example, if I type np.array and then TAB, a new buffer is
created and shows the possible completions:
I actually dislike this behavior, however: my coding style is to have
two windows open at once and to rapidly switch between them with C-c
o. To have Emacs open a second window (or use an existing second
window) and to maintain focus in the IPython interpreter, I’ve
commented out the following lines in the ipython-complete function
of ~/.emacs.d/python-mode-6.0.11/python-mode.el:
(with-output-to-temp-buffer "*IPython Completions*"
 (display-completion-list
 (all-completions pattern completions)))
;; (set-buffer "*IPython Completions*")
;; (switch-to-buffer "*IPython Completions*")
;; (goto-char (point-min))
;; (when
;;  (search-forward (car (all-completions pattern completions)))
;;  (forward-word -1)
;;  (delete-other-windows)
;;  (word-at-point))
)
This leads to behavior that instead looks like this:

Pymacs and ropemacs
Another handy set of plugins are Pymacs and ropemacs. To be honest, I don’t use them as much as I should – I’m hoping this post will re-familiarize me with the basic commands and I’ll start using them more!
Anyway, you probably don’t really need to worry about what Pymacs is: it’s an interface between Python and Emacs LISP, but we won’t be directly using that. What it’s necessary for is rope, which is a non-Emacs-specific Python refactoring library. Ropemacs is just the Emacs plugin for rope.
To install, first install rope itself:
sudo aptitude install python-rope
Now download the Pymacs code and install it into
~/.emacs.d/pymacs-0.25/. Download the ropemacs code and
install it into ~/.emacs.d/ropemacs-0.7/. Add the following to your
.emacs:
```scheme Pymacs and Ropemacs ; pymacs (add-to-list ‘load-path “~/.emacs.d/pymacs-0.25”) (autoload ‘pymacs-apply “pymacs”) (autoload ‘pymacs-call “pymacs”) (autoload ‘pymacs-eval “pymacs” nil t) (autoload ‘pymacs-exec “pymacs” nil t) (autoload ‘pymacs-load “pymacs” nil t) (autoload ‘pymacs-autoload “pymacs”)
; ropemacs (require ‘pymacs) (pymacs-load “ropemacs” “rope-“)
There's a lot that you can do with ropemacs -- if you're interested in
finding out more, read the README that's included in the source -- but
here's a taste to get started. The first time you run a ropemacs
command in an instance of Emacs, you will be prompted to specify your
rope project folder. If you only have one folder for your project,
just select that; if you have a whole module, choose the root module
directory.

Ok, first, better autocompletion: where auto-complete will only keep
track of what you have recently typed, ropemacs can actually look up
method and variable names from a module. Use `M-/` to bring up a list
of completions in the minibuffer (note again the helpfulness of
`ido-mode`, too!):

[![][42]][42]

 [42]: /assets/img/emacs-python/ropemacs-completion.png

(Note that it's not perfect; it seems to have trouble, for example,
finding the correct completions of `np.random.n`. IPython doesn't have
this trouble, probably because ropemacs doesn't actually import the
module and so does not correctly obtain all the attributes.)

You can also look up documentation of an attribute if the point is
over it with `C-c d`:

[![][43]][43]

 [43]: /assets/img/emacs-python/ropemacs-documentation.png

And you can rename attributes/refactor code in not just a file, but
your entire project. For example, to rename `data` to `arr`, hit `C-c
r r` and when the point is over the attribute you want to rename. Then
type in the new name:

[![][44]][44]

 [44]: /assets/img/emacs-python/ropemacs-rename.png

Hit enter, and you will be presented with a list of options (you can
read about what they all do in the documentation). We just want
"perform" here, so press enter again.

[![][45]][45]

 [45]: /assets/img/emacs-python/ropemacs-perform.png

Voila, all instances of `data` are now renamed to `arr`!

[![][46]][46]

 [46]: /assets/img/emacs-python/ropemacs-rename-finished.png

This is more powerful than just a simple find-and-replace: for
example, if you have a variable named `data` and another variable
named `data_array`, you can't just find-and-replace `data` with
something else, because it will likely affect `data_array` as well!

## Aesthetics

For the final part of this post, I'm just going to give you my elisp
code for more aesthetic modifications. A fair amount of it is just the
color scheme, but there are a few other useful options that I usually
want to have set (like disabling the menu bar, scroll bar, and tool
bar). I've tried to document it well, but am happy to clarify anything
if it's not obvious! Here's a screenshot of how my typical Python
Emacs environment looks:

[![][47]][47]

 [47]: /assets/img/emacs-python/python-ide.png

You'll notice that the current line (where the point is) is
highlighted; to acheive this affect you'll need to install the
[highlight current line][21] plugin to the
`~/.emacs.d/highlight-current-line-0.57/` directory and use the
configuration below in the "cursor" section.

For the base color them, you'll need the [color theme][22]
plugin. Install it to `~/.emacs.d/color-theme-6.6.0/` and, again, use
the configuration below in the "color theme" section.

```scheme Interface
;--------------------;
;;; User Interface ;;;
;--------------------;

; always use spaces, not tabs, when indenting
(setq indent-tabs-mode nil)

; ignore case when searching
(setq case-fold-search t)

; require final newlines in files when they are saved
(setq require-final-newline t)

; window modifications
(global-set-key (kbd "S-C-") 'shrink-window-horizontally)
(global-set-key (kbd "S-C-") 'enlarge-window-horizontally)
(global-set-key (kbd "S-C-") 'shrink-window)
(global-set-key (kbd "S-C-") 'enlarge-window)

; set the keybinding so that you can use f4 for goto line
(global-set-key [f4] 'goto-line)

;----------------------;
;;; Windows & Frames ;;;
;----------------------;

; language
(setq current-language-environment "English")

; don't show the startup screen
(setq inhibit-startup-screen t)
; don't show the menu bar
(menu-bar-mode nil)
; don't show the tool bar
(require 'tool-bar)
(tool-bar-mode nil)
; don't show the scroll bar
(scroll-bar-mode nil)

; number of characters until the fill column
(setq fill-column 70)

; specify the fringe width for windows -- this sets both the left and
; right fringes to 10
(require 'fringe)
(fringe-mode 10)

; lines which are exactly as wide as the window (not counting the
; final newline character) are not continued. Instead, when point is
; at the end of the line, the cursor appears in the right fringe.
(setq overflow-newline-into-fringe t)

; each line of text gets one line on the screen (i.e., text will run
; off the left instead of wrapping around onto a new line)
(setq truncate-lines t)
; truncate lines even in partial-width windows
(setq truncate-partial-width-windows t)

; display line numbers to the right of the window
(global-linum-mode t)
; show the current line and column numbers in the stats bar as well
(line-number-mode t)
(column-number-mode t)

;------------;
;;; Cursor ;;;
;------------;

; highlight the current line
(require 'highlight-current-line)
(global-hl-line-mode t)
(setq highlight-current-line-globally t)
(setq highlight-current-line-high-faces nil)
(setq highlight-current-line-whole-line nil)
(setq hl-line-face (quote highlight))

; don't blink the cursor
(blink-cursor-mode nil)

; make sure transient mark mode is enabled (it should be by default,
; but just in case)
(transient-mark-mode t)

; turn on mouse wheel support for scrolling
(require 'mwheel)
(mouse-wheel-mode t)

;-------------------------;
;;; Syntax Highlighting ;;;
;-------------------------;

; text decoration
(require 'font-lock)
(setq font-lock-maximum-decoration t)
(global-font-lock-mode t)
(global-hi-lock-mode nil)
(setq jit-lock-contextually t)
(setq jit-lock-stealth-verbose t)

; if there is size information associated with text, change the text
; size to reflect it
(size-indication-mode t)

; highlight parentheses when the cursor is next to them
(require 'paren)
(show-paren-mode t)

;-----------------;
;;; Color Theme ;;;
;-----------------;

; use the "Subtle Hacker" color theme as a base for the custom scheme
(require 'color-theme)
(color-theme-initialize)
(setq color-theme-is-global t)
(color-theme-subtle-hacker)

(custom-set-faces
 '(default ((t (:overline nil :inherit nil :stipple nil :background "gray2"
                :foreground "#FFF991" :inverse-video nil :box nil
                :strike-through nil :underline nil
                :slant normal :weight normal :height 83 :width normal
                :foundry "unknown" :family "DejaVu Sans Mono"))))
 '(border ((t nil)))
 '(cursor ((t (:background "firebrick1" :foreground "black"))))
 '(font-lock-comment-delimiter-face
    ((default (:inherit font-lock-comment-face :weight ultra-bold))
    (((class color) (min-colors 16)) nil)))
 '(font-lock-comment-face ((t (:foreground "lime green"))))
 '(font-lock-doc-face ((t (:foreground "tomato" :slant italic))))
 '(font-lock-function-name-face
    ((t (:foreground "deep sky blue" :underline t :weight bold))))
 '(font-lock-keyword-face ((t (:foreground "gold" :weight bold))))
 '(font-lock-string-face ((t (:foreground "tomato" :slant italic))))
 '(fringe ((nil (:background "black"))))
 '(highlight ((t (:background "khaki1" :foreground "black"
                  :box (:line-width -1 :color "firebrick1")))))
 '(highlight-current-line-face ((t (:inherit highlight))))
 '(lazy-highlight ((t (:background "paleturquoise" :foreground "black"))))
 '(link ((t (:foreground "DodgerBlue3" :underline t))))
 '(menu ((t (:background "gray2" :foreground "#FFF991"))))
 '(minibuffer-prompt ((t (:foreground "royal blue"))))
 '(mode-line ((t (:background "dark olive green"
                  :foreground "dark blue"
                  :box (:line-width -1 :color "gray75")
                  :weight bold))))
 '(mode-line-buffer-id ((t (:background "dark olive green" :foreground "beige"))))
 '(mode-line-highlight ((((class color) (min-colors 88)) nil)))
 '(mode-line-inactive ((t (:background "dark olive green"
                           :foreground "dark khaki" :weight light))))
 '(mouse ((t (:background "Grey" :foreground "black"))))
 '(trailing-whitespace ((((class color) (background dark))
                          (:background "firebrick1")))))

; make sure the frames have the dark background mode by default
(setq default-frame-alist (quote (
  (frame-background-mode . dark)
)))